Brioche Buns for Summer’s BBQ Fun

20200520_1547114549141774831241926.jpgYes! Barbecue season is here and what could be more satisfying than flipping those juicy patties on your newly-cleaned grill on the patio while sporting that one-pack with a cold beer? Well probably the thought that you’ve made your food from scratch—house-seasoned ground meat, those fresh tomatoes and onions harvested from the pot gardens you’ve labored over during the past couple of months, and that light, buttery brioche bun to make all those come together.

So while I’m grinding that slab of beef while being persnickety with my seasonings, let me share this very light version of a brioche bun recipe that I believe would give that extra yum for your homemade burgers!

Light Brioche Buns

Ingredients:

  • 1 cup warm water
  • 2 tbsps. warm milk
  • 2 tsps. active dry yeast
  • 2 tbsps. sugar
  • 2 eggs
  • 3 cups bread flour (see note*)
  • 1/3 cup All Purpose Flour
  • 1 tsp. salt
  • 3 tbsps. butter (softened))
  • sesame seeds (optional)

*I ran out of bread flour and used APF for the entire batch and it turned out okay. Using this alternative might entail a longer mixing time though.

Procedure:

  • Combine the warm water, milk and sprinkle the dry yeast over to proof. Set aside.
  • Mix flour and salt in a large bowl. Add softened butter, lightly beaten eggs and liquids.
  • Using a hook attachment, mix all the ingredients on low speed for 8-10 minutes. Don’t worry if the dough looks a little craggy. It will also feel a bit wet but that’s okay. (Mental note to self to take these messier photos for better visualization!) :p
  • Place the dough into a lightly-oiled bowl and let rise for 1-2 hours in  a warm room.
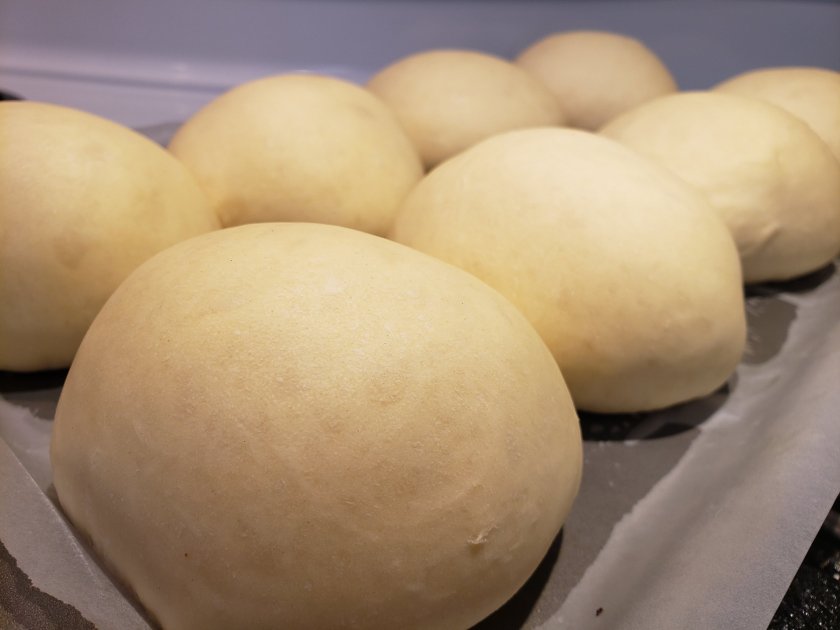
  • On a floured surface, divide the dough into desired sizes accordingly. I did mine for eight equal parts.
  • Flatten the cut dough using a rolling pin. Fold the sides towards the center, gently tucking the dough in to make a seam. Flip the dough over and shape into balls. (Again with those photos!)
  • Place pre-shaped dough in  a flat pan with parchment paper and let rise for 30-45 minutes or until the dough doubles in size.
  • Meanwhile, prepare your egg wash and sesame seeds while pre-heating your oven at 400°F. Place a pan with water at the bottom rack of oven for steaming.
  • When dough is ready, brush the top with egg wash and sprinkle some sesame or poppy seeds.20200520_1450566409314932596993134.jpg
  • Bake for 15-20 minutes while your caramelize those onions and munch on a pickle or two! 🙂

We tend to cut back on eating enriched bread especially when we have that summer bod in mind. But these brioche buns are so light and fluffy that the idea of an extra burger feels less guilt-free…ish. :p

Enjoy and happy baking!

Ube Keso Pan De Sal (A Recipe with Love) ♥

In the spirit of sharing amidst lockdowns and quarantines during this global pandemic, and as we productively while the long hours away by keeping our kitchens busy and our ovens warm, allow me to share a simple recipe that will hopefully bring some delight into your homes. From my oven to yours, from my heart to yours. Yes! 😉

I’ve seen bakers posting about the new craze of three Pinoy favorites put together—pan de sal (bread roll), keso (Eden cheese to be very specific), and ube (purple yam)—all rolled into a truly delectable and beautiful purple bun! I thought that was a brilliant play on flavors and I could not wait to make some. I’ve read a lot of recipes on this and after a couple of tweaking and several attempts later, it is with confidence that I share this one, my first, ever, yay! 🙂 Friends, I give you, this recipe with love. ❤

Ube Cheese Pandesal
Yield: 12

Ingredients
3 1/2 cups All Purpose Flour
1/2 cup Sugar
1 1/2 tsp Instant Yeast
1 tsp Salt
1 cup Warm Milk
2 tbsps Oil ( I use Canola Oil for a more neutral taste)
1 Egg
1 tbsp Ube Extract
1 cup Cooked and Grated Purple Yam
(or rehydrate 1/4 cup powdered ube with 3/4 cup hot water)
Cheese (cut into sticks)
Breadcrumbs

Procedure
* If using Ube powder, start by rehydrating. Mix the powder and hot water and let it sit.
1. In a large mixing bowl, combine all the dry ingredients (flour, sugar, yeast, salt).
2. Add in the warm milk, oil, beaten egg and extract.
3. Mix on low using the dough hook attachment until everything comes together.
4. Add the purple yam. Continue mixing until the dough no longer sticks to the sides of the bowl.
5. Place dough on a lightly-floured surface. Knead for 6-8 minutes. (I tried doing everything manually and I had to knead longer as I was working with a stickier dough.)
6. Once you get a ball of smooth dough, place in a lightly-oiled bowl, cover with a kitchen towel and proof in a warm place for 1-2 hours or until the dough doubles in size.
7. Gently remove the dough from the bowl and divide into 12 equal parts (approximately, 90 grams each).
8. Pre-shape into small balls then flatten with a rolling pin.
9. Insert cheese chunks/slices in the middle of flattened dough then fold the sides to tuck the cheese in. If you have extra ube, you can add some with your cheese inserts. *Do not be tempted to put a lot as it might cause underbaking.)
10. Roll dough balls onto the bread crumbs, just enough to lightly coat the surface.
11. Place coated buns into prepared pans, an inch apart from each other and allow to rise in warm room for another 30-40 minutes.
12. Bake in preheated oven (340°F) for 20 minutes.

It might seem like a lot of words but the process can simply be broken down to mixing, kneading, putting in a lot of love, proofing, shaping then baking. This recipe calls for a minimal amount of bicep work but yields a lot of gastronomical satisfaction, especially for the Pinoy palate.

Enjoy unleashing the inner bakers within us and keep safe everyone! ♥♥♥

The Search for the Perfect Cake

Screen Shot 2020-01-19 at 7.37.45 PM
From Wayne Thiebauld’s collection of cake paintings

I fell in love with cakes at a young age. My childhood best friend had older sisters who would often bake what I thought were the most delectable creations. They would huddle over their dining room table with their mixing bowls and recipes and whip up the most amazing cakes that I could only dream of making. I thought they were all so beautiful and dainty as I witnessed them sifting and whisking and mixing. I adored them. And I adored whatever they made.

I was eleven when I summoned the courage to make my first cake. And that came with a lot of sneaky planning. My family was scheduled for a trip to the city and I volunteered to stay home to take care of the pets. I had everything deviously planned out. If whatever I make would turn out to be a disaster, I would just chuck it out. The evidence of my failure would be gone and I will not breath a word to anyone.

So the long awaited day came when it was just the cat at home to witness my first trial. I rolled my sleeves up and baked. It was good. And no, it’s not a biased conclusion of an 11-year old girl. It was truly good! It took  a lot of self-control to not finish the whole 9 x 13 inches of chocolatey goodness! I had to painstakingly wait for everyone to come home so they could taste it, be gobsmacked that I made something unbelievably good, (yes, I was that confident, haha!)  so that they will let me do as I please with the oven now that I’ve proven I could work with it. Boy was I so full of myself that time! 😉

83595933_10216991928535169_7320276752461201408_o
Because every cake is an achievement! 😉

I was not able to make cakes that were as good as that first one the next couple of times, or years for that matter. But I achieved my purpose then–for them to let me tinker with the oven and play with whatever ingredients I could find in the shelves. My love for pastry and baking grew as my search for the perfect cake began.

Cakes as we know them today have come a long way from the first ‘kaka’, believed to be of Viking origin. The ancient Greeks then popularized ‘plakous’ (meaning flat) which consisted of flour blended with honey, eggs and nuts. Now we have modern cakes, fancy entremets, multi-layered paves, and visually out-of-this world cake designs that I cannot even dream of conceptualizing. But throughout the years and a couple of unwanted pounds after, I realized that if I want to eat cake, I want to taste cake. By that I mean enjoying it with its wholesome basic elements–a flavorful base and just the right amount of frosting or not, no garnish necessary.

These days when I gave myself the opportunity to try out different recipes with whatever stuff I can find in the pantry, I realized that there are those I love to make and those that I hate. Some I could finish a slice and some I could not even bring myself to taste. I’ve grown a very discerning palate or sense of preference but it weirdly does not have anything to do with flavors but more of how a recipe speaks to me. I realize that I always delight in something that brings nostalgia.

Like with most foods and smells, our senses get excited more strongly when we can relate, and such associations are mostly founded on memories. In my case, I always go back to those days when every slice of cake regardless of what it was made me giddy with excitement.  To those cakes that were made by my best friend’s older sisters. My aunt’s banana cake with lemon glaze. My sister’s squash cake that was so delightful even without any frosting. My mother’s big, fat pancakes. And to that one fateful day that I schemed to bake for the first time.

I haven’t found my perfect cake yet. Because there probably isn’t one. But it is for this reason that I’m equally excited every time there is a new one to slice and try. It might just be that.


%d bloggers like this: